Tuesday, November 30, 2010

Peppermint Chocolate Meringues

One of my favorite parts of the Christmas season is all the peppermint flavoring flying around. From peppermint mochas to peppermint ice cream, it's just such a wonderful flavor that evokes the holiday feeling!

This year, to get ready for the flood of Christmastime following Thanksgiving, I actually baked a batch of peppermint meringues before the big turkey day, since they hold so well. And boy, did these turn out wonderful! In fact, my husband couldn't stop raving about how they are his favorite holiday baked good that I make. And I make them small enough that he can have 2 or 3 at a time! I hope you give them a try!

Peppermint Meringues
adapted from Mark Bittman's basic meringue recipe

3 egg whites, room temperature
3/4 cup superfine sugar
1/2 tsp vanilla extract
1/2-1 tsp peppermint extract (I'll explain this later)
Red food coloring (optional)
Dark chocolate

Preheat the oven to 175 degrees. Line two baking sheets with parchment paper.

Use an electric mixer (believe me from experience, a good quality mixer is necessary with meringues!) to beat the egg whites on medium until they begin to foam. Next, add the sugar very slowly as the mixer is still on medium. Once all the sugar is added, crank it up to the highest setting, and let it whip for a couple minutes until the whites are no longer shiny.

Then, turn down the power to medium low, and add the vanilla and peppermint extracts. I chose to use 1 tsp of peppermint extract for these meringues, which makes them pretty potent, but that's because later we dip them in chocolate, so you want a strong peppermint flavor to stand up to the chocolate flavor. If you're not going to dip in chocolate but rather plan to just throw on some sprinkles or something, I would suggest only using 1/2 tsp of peppermint extract.

Since these are peppermint flavored, I also chose to drop in a little red food coloring to give them a pretty pink color, but you could leave them white, or even get creative and do two batches of red and white or even green and red!

Once it's all mixed together, either get out a piping bag (which I don't have), or a ziplock. Scoop all the meringue fluff in (and if you're using a ziplock, cut the end off), and pipe the fluff into little circles on your parchment-lined baking sheet.

meringues 1


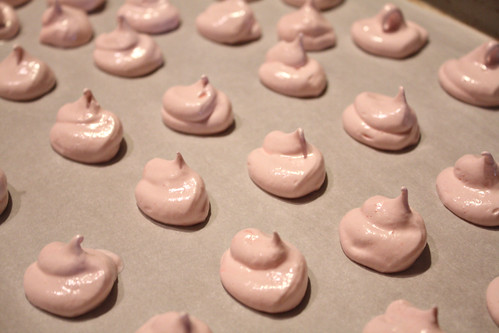
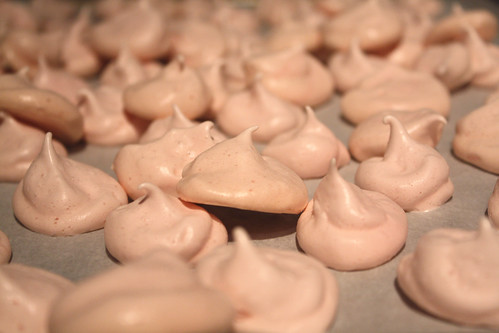
I chose to make mine rather small so you can just pop them in your mouth!

Next, put the baking sheets in the oven, for anywhere from 2-4 hours. Yup, you heard me. HOURS. There's a reason why meringues are often also known as Forgotten Cookies! The key in telling when they are done is that they will finally have a dry, matte appearance on the surface, instead of the slightly glossy surface they went in with. If you're having a hard time getting them to finish, you can bump up the heat to 200 or so, but be careful not to go too high. Then you'll just have chewy egg whites!

One cardinal rule: DO NOT OPEN THE OVEN WHILE THE MERINGUES ARE IN THERE. PERIOD. They will fall and turn into sad, limp cookies that you will throw away.

Once you think the meringues are done, turn off the oven, and let them sit in there as the oven cools naturally for 1-2 hours.

When you're done, they'll look like this!

meringues 2


Now it's time for the chocolate.

Mmmmmmm.....

Choosing your chocolate here is very important. I chose to use a high quality dark chocolate, because it goes SO well with the peppermint. The problem though is that it melts incredibly easily, so it's not good for times where the cookies need to travel or be eaten by little messy children. If you need the chocolate not to melt as quickly, I suggest chocolate bark.

So once you have your chocolate decision made, melt it down and dip the bottoms of the meringues in. Set them nicely on some wax paper to cool.

meringues 3


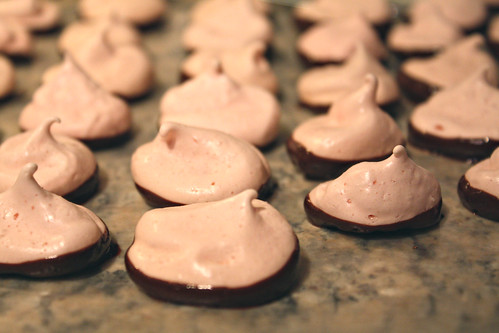
If you have the space for it, you can stick them in the fridge to speed up the cooling process.

Then there you have it! A sweet, pepperminty, chocolatey treat! And the best part is they last FOREVER in a ziplock in the fridge! Unless, of course, you have a husband who can't resist!

meringues 4

Friday, November 26, 2010

Black Friday Giveaway!

No doubt you've all been up since 3am, fighting the crowds for some awesome deals! Now it's time for another great deal... a free one!

Thanks to the wonderful people at CSN (counter stools, bedding, cookware - oh my!), today I am giving away some fun crafty organizers to get your craft space in order! Just in time for holiday crafting, these handy organizers will keep your work space (and sanity!) organized and tidied up!

The two items I'm giving away today are...


The Bankers Box Eight Compartment 8x11 paper sorter

and...


A Nine Canister Carousel Organizer!

These two items will be a huge help in organizing your paper and accessories, and I just love how the carousel organizer rotates so you can see everything!


**The Giveaway**


The giveaway starts right now (yes, right now!) and goes through Wednesday, December 1st, Midnight CST.

To enter, comment on this post and tell me why you need some organization in your life!

For extra entries, blog about the giveaway, post it on Facebook, tweet it, or any other way of sharing it with others! Then come back here and leave me a new comment for each extra entry.

To be eligible to win, you must be a follower of Food, Wine, & Mod Podge, and a resident of the US or Canada.

I will announce the randomly-selected winner on Thursday, December 2nd, so keep an eye out for it!

Happy Black Friday!

Tuesday, November 23, 2010

Empty Frame Collage

You all may remember some time ago, I asked for ideas of what to do with my oh-so-bare stairwell:

IMG_4731


The overwhelming majority of you suggested I do an empty frame collage, like the beauties we've seen around blogland. And I must say, I was already in love with the examples I had seen, and clearly this was what everyone thought would be perfect for my space!


After lots of trips to Salvation Army and one guy standing on the corner selling a bunch of stuff, I finally acquired enough frames! I painted and painted and painted (a painstaking process when you can't buy spray paint so you must paint by hand), and after multiple coats, I finally had my beautiful stairwell complete! Just in time for my Thanksgiving guests!

Stairwell 1
Stairwell 2


I absolutely LOVE the way it turned out! It makes me smile every time I walk down the stairs!

I hope you all have a wonderful Thanksgiving with family and friends. But after the turkey and your guests are all stuffed, don't forget to drop by Food, Wine, & Mod Podge! Starting on Black Friday, and thanks to the wonderful people at CSN (counter stools, bedding, cookware - oh my!) I will be giving away some handy-dandy crafty storage solutions to one of my lucky readers! So make sure to stop by and enter to win!

Friday, November 19, 2010

Butternut Squash Soup with Wild Rice and Andouille Sausage

Recently, I was wandering through the produce market, and saw a huge stand full of butternut squashes. (Squashes? Squash? Squashi? What's the plural of squash?) Now, I know this is a wonderful fall vegetable, but to be completely honest, I had never, ever tried it. I've seen it in plenty of recipes, but never even eaten it out at a restaurant. But I couldn't help myself, I had to pick one up and give it a shot!

After combing through butternut squash soup recipes, I came across one I just couldn't pass up. It was a soup recipe that wasn't just pureed squash, but also had sausage and rice and, well, flavor and texture. If I was going to make this a full dinner, it needed to be more than just pureed squash. So I grabbed the recipe, adapted it slightly, and the result was fantastic!

Butternut Squash Soup with Wild Rice and Andouille Sausage
adapted from Emeril Lagasse's Smoked Sausage, Butternut Squash, and Wild Rice Soup

Start with one butternut squash.

blog Butternut Squash Soup (1)
blog Butternut Squash Soup (4)


Core it, removing all the seeds and membrane, and cube it, removing all skin. Then drizzle with olive oil and sprinkle with salt and pepper.

blog Butternut Squash Soup (6)


Spread out the squash on a baking sheet, and bake at 400 degrees for 45 minutes to 1 hour, or until tender.

blog Butternut Squash Soup (8)
blog Butternut Squash Soup (9)


Remove from oven, and let cool completely. This is a good thing to do waaaaaaay before you intend to make the soup, so you're not anxiously waiting for the squash to cool.

When your squash has cooled, puree it with 1 cup of chicken stock.

blog Butternut Squash Soup (12)
blog Butternut Squash Soup (13)


Setting the puree aside, move on to your wild rice. Begin cooking 1 cup of wild rice in 4 cups of chicken stock. Bring to a boil, then reduce to simmer and cover. This will take upwards of 45 minutes, so check often to make sure the rice does not get too dry. Additional water may be necessary. Cook until the rice is just barely less than al dente, so just slightly underdone.

Once the rice is on, begin cutting up the andouille sausage. Emeril's recipe calls for smoked sausage, but I found some awesome Amy's Chicken Andouille Sausage that has way more flavor and is much healthier for you, and I think it made a world of difference.

blog Butternut Squash Soup (16)


Sautee your andouille with one medium white onion, chopped, and some olive oil.

blog Butternut Squash Soup (20)
blog Butternut Squash Soup (21)


Sautee until the onions begin to brown and become soft, and brown bits start sticking to the bottom of the pan. Once this happens, add 3 cups of chicken stock and your squash puree.

blog Butternut Squash Soup (22)


Bring to a simmer for 15 minutes, uncovered.

Next, add the cooked wild rice.

blog Butternut Squash Soup (25)


Then add 3/4 cup whole milk and a handful of chopped Italian parsley.

blog Butternut Squash Soup (27)


Simmer for 10 minutes. During the final 10 minutes, get out your bowls, and toast up some nice, crusty sourdough bread.

Serve up, and enjoy!

blog Butternut Squash Soup (30)
blog Butternut Squash Soup (31)

Monday, November 15, 2010

Saturday Morning Mod Podging

One of my favorite times of the week is Saturday morning. I usually get up an hour or two before Chris, so I come downstairs, put on a pot of coffee, and have some quiet time to myself. Sometimes it involves a blanket and a snuggly kitty on the couch, and sometimes, like this past Saturday, it involves Mod Podge.

I have been collecting frames to do a frame collage up the wall of my stairwell, and have slowly been painting them the same color. However, there was one frame I found at Salvation Army that had a nice matting and was in relatively good shape, so I had a hard time ditching everything but the frame for the collage. I just knew I needed to give the whole thing a second life!

This is how it started:

blog Gold Copper Leaf Frame (1)


A pretty dull, lifeless hydrangea, in a cream frame that clashed with the slightly brighter cream mat. But oh, the potential!

I decided to cover the sad little hydrangea with a burnt orange paper, and then stamped and embossed (see embossing tutorial here) little gold fall leaves all over it. Then, I whipped out the Mod Podge and some gold and copper leaf fleck that I had left over from my Fall Salad Plates. Using the Mod Podge as both the glue and the sealant, I flecked the frame so that it was speckled with gold and copper.

Then, after letting it dry and reassembling, I had new fall art to hang!

blog Gold Copper Leaf Frame (2)


It looks just great hung in my kitchen/dining area, and it was a fun and easy project to do on my peaceful Saturday morning!

blog Gold Copper Leaf Frame (55)

Sunday, November 14, 2010

Food Tour: Singapore & China

As I've mentioned in a couple posts, I recently had the chance to go to Singapore and China for work. While I was there, I made sure to bring my camera, and anytime I wasn't in a formal work setting, I snapped away! And not surprisingly, the focus of most of my pictures was the food. I got to try some really tasty things (Singapore chili crab) and some really unusual things (duck tongues), but overall the whole trip was a wonderful tour of local food!

So now I'm going to stray from my normal recipe posts to share some pics with you. I promise I won't storytell on each one, I just want to share with you my food tour through pictures!

blog China (3)
blog China (8)
Duck Tongues!
blog China (11)
Duck Liver
blog China (12)
Duck...something
blog China (16)
Beijing Roast Duck
blog China (31)
The best part of the duck -- you dip it in sugar!
blog China (36)
Can you tell yet that I'm at a duck restaurant?
blog China (39)
blog China (45)
More duck tongues, but this time in a mixture in a lettuce cup
blog China (48)
blog China (209)
blog Singapore (11)
Fried buns
blog Singapore (12)
Fried bean curd
blog Singapore (17)
Singapore Chili Crab!
blog Singapore (20)
blog Singapore (25)
blog Singapore (22)
Black Pepper Crab
blog Singapore (52)
Savory chicken crepe
blog Singapore (117)
The original Singapore Sling
blog Singapore (140)
Fish Head Curry

What a great trip!