You know that show on The Food Network "
The Best Thing I Ever Ate?" Well, they also have a cooking version, "
The Best Thing I Ever Made." And if I was ever invited to contribute to that show, I would make this pasta.
I'm being completely serious, this is the best thing I've ever made, it is so incredibly, outrageously delicious.
It's blowing my mind just thinking of it.
If there's one thing I can say about this pasta, is
do not skip any part of this recipe. I know you'll be tempted to just omit the breadcrumbs, or maybe you don't have any lemons for zesting lying around.
Then wait to make the pasta. Wait until you have the time, and the ingredients, and the love, to make this pasta the thing of beauty that it is.
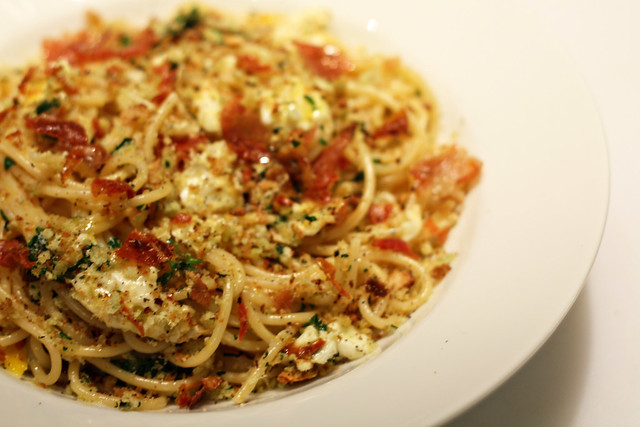
Spaghetti with Soft Eggs and Speck
adapted from Food52
*note: this recipe makes one serving. Why? Well, the original recipe author was a military wife who often had to make meals for one while her husband was deployed, and in my case, my husband won't eat eggs or pecorino romano so I made this on a night when he was out of town. I suggest you increase the recipe accordingly.
Pangritata (a word not in my vocabulary previously, this is the seasoned breadcrumbs part of the recipe)
2 tablespoons olive oil
1/3 cup fresh or stale coarse breadcrumbs (I pulsed an old part of a baguette in the food processor)
2 teaspoons minced fresh Italian parsley
zest from half a lemon
Heat 2 T olive oil in a large skillet over medium-high heat. Add the breadcrumbs and sauté until beginning to brown, about 3 to 4 minutes. Add the parsley and the lemon zest, and toast for another minute until the mixture is crispy and golden brown. Set aside.
Spaghetti with Soft Eggs and Speck
4 ounces spaghetti
1 tablespoon olive oil
1 tablespoon unsalted butter
3 cloves garlic, minced
2 large eggs
2 tablespoons chopped Italian parsley
4 paper-thin slices of speck
(speck is a smoked prosciutto)
freshly ground black pepper, to taste
1/4 cup grated Pecorino Romano cheese
Lay out the slices of speck on a baking sheet and either toast them in a toaster oven or in a broiler. Because the slices are
so thin, they will cook very, very quickly, so keep an eye on them to make sure they crisp but don't burn. This will likely take 1 minute, maybe 2 if you're starting from a cool toaster oven. Remove and set aside to cool.
Bring a large pot of well-salted water to a boil and cook pasta to al dente according to directions on box.
After adding the pasta to the boiling water, wipe out the skillet from the pangritata, add 1 T olive oil and 1 T butter and melt together over medium heat. When the oil/butter mixture is hot, add the garlic and immediately break the eggs into the skillet. If need be, lower the heat a bit. You want the garlic to cook without burning and the egg whites to set, but the yolks to remain runny.
Reserve 1/2 cup of the starchy cooking liquid from the pasta before draining when al dente.
Add pasta back to the pot, pour the eggs and all the fat from the skillet onto the pasta, add the parsley and half the cheese, and toss well, breaking up the eggs as you do. If it is looking a little dry, add some of the reserved cooking liquid (for mine, I ended up adding about 2 T).
Break up the toasted speck (it will be thin and crisp) and toss with the pasta.
Plate the pasta and eggs, season well with freshly ground black pepper and a pinch of salt, sprinkle with the remaining grated cheese and then top with the pangritata.
Eat immediately, with a nice glass of wine.