Sunday, May 30, 2010

De-Re-Constructed Chicken Noodle Soup

The other night, Chris and I were texting back and forth about dinner while on the commute home. I was feeling stuffy from allergies, and though that's not exactly a cold, Chris suggested the best treatment would be some chicken noodle soup! But that day we wouldn't be home until about 7, and good chicken noodle soup takes at least an hour and a half.

What to do... what to do...

Lightblub!

Cook the components separately, then combine to make chicken noodle soup!

De-Re-Constructed Chicken Noodle Soup

Start by heating the oven to 400 degrees.

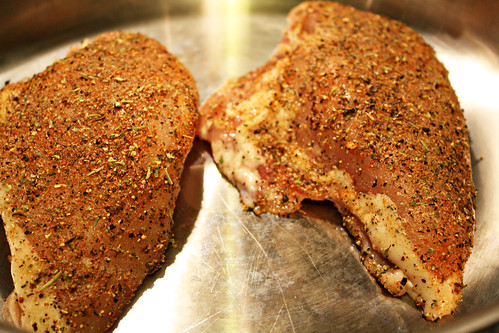
Grab some chicken. We had bone-in breasts on hand, so we used those. Then heavily season one side with all sorts of seasonings. We used seasoned salt, italian seasoning, garlic powder, pepper, and Joe's Stuff. Place in an oven-proof pan with sides.

De-re-constructed Chicken Noodle Soup edited(6)


Next, pour about 2 cups of chicken stock in the pan with the chicken. Do not pour directly on top of the chicken, you'll wash off all the delicious seasoning you just put on them!

De-re-constructed Chicken Noodle Soup edited(8)


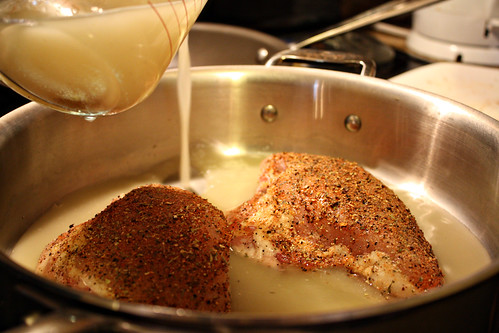
We also put another pinch of italian seasoning in with the stock.

De-re-constructed Chicken Noodle Soup edited(10)


Stick it in the oven, uncovered, at 400 degrees.

Now chop up some carrots, onion, and celery and throw in a pot with about a tbs of olive oil. Stir around until the onions begin to soften, and again feel free to add a little italian seasoning.

De-re-constructed Chicken Noodle Soup edited(15)


Once the onions are relatively soft, add some chicken stock, which will be the base of your soup. The amount of veggies and stock you make will depend on how many people will be eating the meal, so plan accordingly!

De-re-constructed Chicken Noodle Soup edited(16)


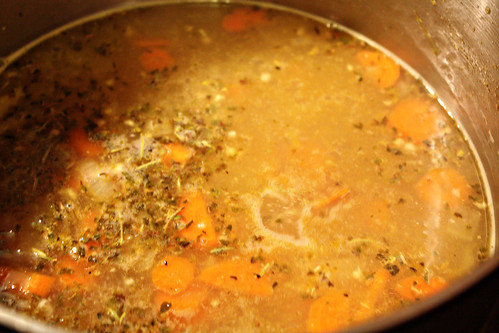
Bring it up to a simmer, and leave it alone.

Now grab some noodles. I chose to use fine egg noodles because they cook quickly and are easy to eat in a soup. Cook to al dente.

De-re-constructed Chicken Noodle Soup edited(23)


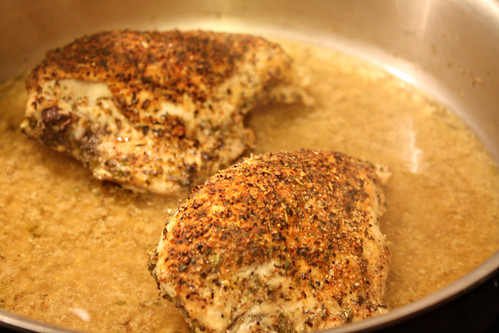
This whole time, keep an eye on your chicken. By the time you finish with the veggies and the noodles are ready, your chicken will probably just be about ready. Stick a thermometer in it until it reads 165-170. We don't want undercooked chicken!

When they're done, the seasoning will have created a beautiful crust on top.

De-re-constructed Chicken Noodle Soup edited(24)


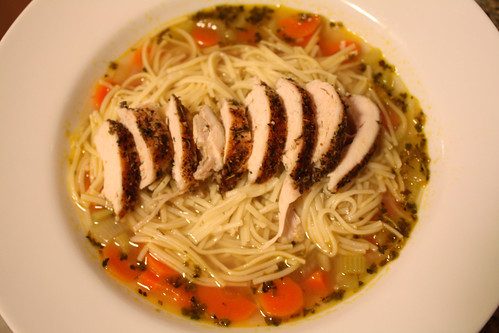
Now it's time to start the re-constructed part of this dish!

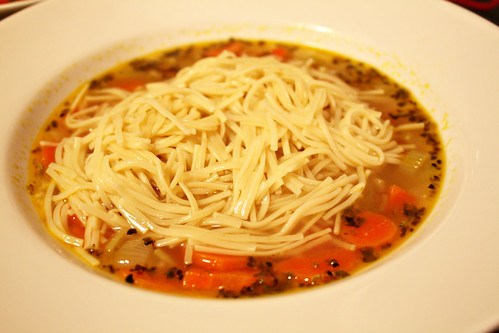
Pour the veggies and stock from your pot into your bowl.

De-re-constructed Chicken Noodle Soup edited(34)


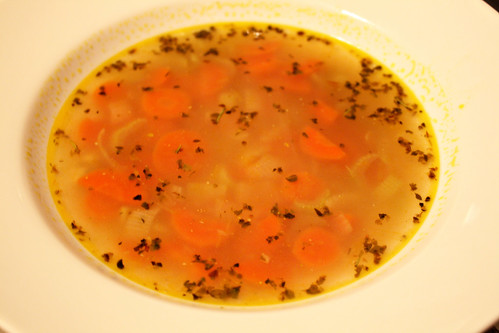
Then add the noodles...

De-re-constructed Chicken Noodle Soup edited(35)


Finally, slice up your chicken and arrange on top.

De-re-constructed Chicken Noodle Soup edited(39)


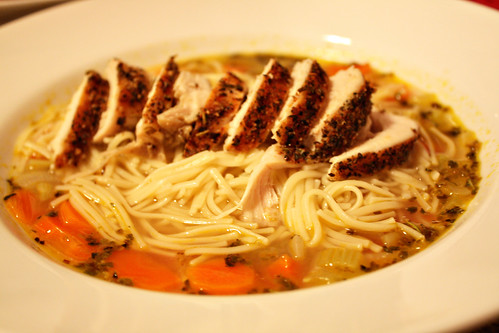
Wonderful! It's a little spin on the traditional chicken noodle soup, but it definitely has all the flavors and components, and takes half the time!

De-re-constructed Chicken Noodle Soup edited(42)

Wednesday, May 26, 2010

Felt Flower Tutorial

Have you ever looked at cute flower brooches in boutique stores and thought, “I could do that!” ?

Well, I do, all the time. I recently was perusing Etsy and came across some adorable felt flowers. I was enamored, so cute! Think of their many uses! Then I looked at the price: $30! Forget that, I’m going to make them myself!

Felt Flower Tutorial

Start with a sheet of felt, whatever color you prefer.

Felt Flower edited(1)


I should warn you ahead of time, yes that is a cutting board, and yes those are my pajamas, and yes I’m sitting cross-legged on the couch on a Saturday morning. Some of the best crafting takes place in these conditions!

Now, cut a scalloped strip out of the felt. I used a pen to mark the tops of my bumps so that they would be relatively even. I spaced them about an inch or so apart.

Felt Flower edited(4)


Ta da!

Felt Flower edited(3)


Then, grab a needle and some thread of the same/approximate color as your felt.

Felt Flower edited(7)


Tie a knot at the end of the thread, and start making relatively big stitches starting on one side of the scalloped felt, like this:

Felt Flower edited(8)


You’ll notice as you start to pull the thread through, the felt starts to fold up on itself and will begin to curl.

Felt Flower edited(9)


Pull it tight, and secure the ends together. So pretty!

Felt Flower edited(11)


But we’re not done! Well, you could be. It would be very pretty as a flower by itself, but you could also keep going!
Grab the felt and cut out another, smaller scalloped strip.

Felt Flower edited(13)


Stitch through the base like we did the original flower, and sew together the ends.

Felt Flower edited(14)


Good! Now tack the smaller flower into the center of the larger flower. I chose to then cut a tiny little circle for the very center of the flower, and stitch in place. Then you’re done!

Felt Flower edited(27)


So cute! You can tack it on anything now. Put it on a purse, sew it to a headband, lots of possibilities! I like to tack it to a safety pin so I can move it all around. Also you can have fun and do different shades for the different layers of the flower. The possibilities are endless!

Felt Flower edited(23)

Saturday, May 22, 2010

My Favorite Breakfast

This is my favorite breakfast. If I could eat this every morning forever, I would be one happy camper.

Egg hash crock edited(1)


Know what it is yet? And no, it's not soup. I just found these little vintage crocks at a little store once and couldn't resist!

Egg hash crock edited(2)


Does this give you a better idea?

A little bit? But what's hiding under those eggs?

Egg hash crock edited2 (18)


Ohhh delicious! Hiding under the eggs, with their sinfully runny yolk, is a hash of potatoes, onions, and orange and green bell peppers. To die for! The reason why I love this meal so much is how well all of these flavors go together in one bite. Personally, and I'm not ashamed to admit this, I eat this with a spoon so you can get all the yolk and little pieces in one bite. Once you break into the egg, the yolk starts to coat the hash, and you get this wonderful smooth coat all over the crispy, soft potatoes. It's absolutely to die for. Then, you take a bite of the crunchy bacon, and, well, everything is right with the world!

Here's how I do it:

Cut up potatoes into small, bite-size pieces. Then season them. I like to use seasoned salt and some freshly ground black pepper, but as I always say with spices, do it however you like! Then put in a bowl and throw them in the microwave until they are soft and can just be poked through with a fork. Do it a couple minutes at a time to make sure you don't overcook.

While the potatoes are in the microwave, put a pan on the stove with some oil in it (2 tbs or so) and turn the heat on high.

Next, cut up some bell peppers and onions, also into fairly small pieces. Since all the flavors need to go together, they need to be small enough to all fit into your mouth at the same time!

Once the oil is hot enough to sizzle, throw the potatoes in to get a good crisp on the outside. I prefer to flip them in the pan rather than stir them around, but do whatever you're comfortable with. About two minutes in, turn the heat down to medium and toss the peppers and onions in too, and get them all mixing around together, getting nice and crispy.

When you think they're ready, put them to the side and put a top on the pan so they retain heat.

Now for the eggs. If you noticed in the pictures, I actually had two eggs that were cooked together to create a little egg lid on my crock. I did this by using a teeny tiny non-stick pan. The base of this pan is 4-5 inches in diameter, tops. Put a little butter in the bottom of the pan, and heat. Once it is hot, crack the eggs in. I prefer over-easy eggs, so I let them cook until the underside has a firm white, then I flip the whole thing over for about 30 more seconds so the remaining white cooks, but the yolk does not.

Then scoop some of the hash into a bowl, or in my case a little crock, and slide the egg topper right on. I then sprinkle a little more seasoned salt on top of the eggs for some flavor.

Serve with some bacon, and you've got a delicious breakfast!

Egg hash crock edited2 (18)

Wednesday, May 19, 2010

Love by the Glass


Today I want to share with you a great book that was given to me by my mother-in-law. The book is called Love by the Glass, and it’s written by Dorothy Gaiter and John Brecher, the authors of the "Tastings" column in The Wall Street Journal. Gaiter and Brecher are a married couple who met as newbies in the journalism world, and newbies in the world of wine. Just as California was finding its identity in the wine industry, the couple starts to explore whites, reds, and especially sparkling/champagnes. The book follows them from meeting, to new jobs, the wine column, and kids, and intermixes their knowledge and love of wine.

The reason why I loved this book is because it was half life story, half wine textbook. They went into so much detail about the types of wines, their origins, their histories. Yet it all followed the storyline of their life and love, so you hardly noticed how much you were learning. In fact, there was so much information that I actually want to read it again to absorb more! Now regarding the storyline, their love story, it almost seemed fate how well everything layed out for them. Sure there were bumps in the road, which they talk about, but their love for each other, how they focused on building their relationship through wine, is something to truly strive for. It inspires you to be a better partner, with or without the wine!

It’s a wonderful read, I highly recommend you add it to your book list!

Tuesday, May 18, 2010

Happy to link up with these great blogs!


Mondays

The Girl Creative

mmm button

Tuesdays


Blessed with Grace


Wednesdays


Show and Tell Green
Make it Yours @ My Backyard Eden


Thursdays

giveaways
PonyTails and FishScales
A Glimpse Inside featured button


Fridays

The Girl Creative
Friday Food @ MomTrends
Favorite%2BThings%2BFridaybig%2Bbutton.jpg
Chic on a Shoestring Decorating

Photobucket


Saturdays


Photobucket


Sundays


UndertheTableandDreaming

Saturday, May 15, 2010

Grilled Cheese for Grown Ups

I love a good grilled cheese sandwich. There's nothing like a hot grilled cheese made with Velveeta, dunked into tomato soup. It's gooey, and delicious, and reminds me of my childhood.

But who says grilled cheese sandwiches have to be childish? Can't there be a grown-up, sophisticated version?

Heck ya!

The other night, Chris was off playing softball, so I was left to my own devices in the kitchen. I was searching through the fridge for something simple to make for one, and as I saw the bread... the brie... an idea popped into my head!

Grilled Brie & Fig Jam Grilled Cheese

I'll pause a moment and wait to let that sink in.

Good?

Ok, here we go!

Start with some really good, fresh bread. Don't use the Wonderbread for this baby.

Brie Fig Grilled Cheese edited(3)


Slice it into two pieces, not too thick, but definitely not too thin.

Brie Fig Grilled Cheese edited(11)


Next, butter one side of each slice. While you're doing this, start heating up a nonstick pan on the stove.

Brie Fig Grilled Cheese edited(12)


Once the pan is quite hot, put the bread in butter side down. Now turn the heat down to medium.

Brie Fig Grilled Cheese edited(17)


Let it sit there until you are happy with the browning. I prefer a little char on mine, but if you prefer it a little less toasty, by all means!

Brie Fig Grilled Cheese edited(25)


Now, grab your brie and fig jam.

Brie Fig Grilled Cheese edited(19)


On the non-buttered, non-browned side, spread the fig jam on one slice, and place the brie on the other.

Brie Fig Grilled Cheese edited(31)


Ok... so three slices of the brie would've been just fine, but I had already cut four, so I just threw it all on there. A little extra cheese never hurt anybody! (Don't tell your cardiologists I said that.)

Next, we want to broil the slices. I use a toaster oven for this, but if you don't have a toaster oven, the regular oven will work just fine.

Brie Fig Grilled Cheese edited(34)


Now carefully monitor your sandwich. You'll notice the fig jam will start to make big bubbles as the sugar starts to heat and boil. You may need to pull the fig jam slice out first if it looks caramelized enough.

Brie Fig Grilled Cheese edited(37)


Doesn't that look good? What you can't see in this picture is that the fig jam has actually sort of candied itself, and is now almost a crunchy sweet fruit candy layer on my bread.

Then, once the brie starts to brown on the edges (or when you just don't have the patience to wait any longer...) pull the other slice out.

Brie Fig Grilled Cheese edited(38)


Finally, put them together, and you've got yourself a killer grilled cheese sandwich!

Brie Fig Grilled Cheese edited(49)


Sure, the Velveeta-Wonderbread grilled cheese will always have a place in my heart, but from now on, this sandwich will have a place reserved in my stomach.